

Two years after moving to Northern Virginia, I have finally put the finishing touches on my rocket barn. I’ll be publishing new updates, including all of the new goodies I’ve built and purchased for rocket building. Stay tuned!
Building Rockets for space in my barn

Two years after moving to Northern Virginia, I have finally put the finishing touches on my rocket barn. I’ll be publishing new updates, including all of the new goodies I’ve built and purchased for rocket building. Stay tuned!


Launched the “Airstream of Consciousness” yesterday at the Midwest Power XIII Rocket Launch in downstate Illinois. This was a hand made scratch built all-carbon fiber rocket using my filament winder for the airframe and a 10 ton press for the fins. Since Carbon Fiber attenuates (acts as an RF shield) my ham radio spectrum downlink, I used a traditional fiberglass nosecone and put the electronics there. I had 7 camera’s on the rocket! If you look closely, on the tip of the nosecone, I had a bubblcam. I was a kickstarter backer for this thing, it’s basically 4 video camera’s built into a spherical ball to take 360 video’s which can be played back on an oculus rift, Google cardboard, or on YouTube using a mouse. Unfortunately, the centripetal force on the camera due to the spin ejected the microsd card mid flight.
Video in all it’s glory:

The most common question I get from people who first find out I enjoy rocketry (after – “is it legal?”) is how the rockets are built, and what kind of tools do I use. I’ve recommended my own blog of course, but realized the level 3 build which started this blog didn’t discuss any tools, or core manufacturing techniques at all. So, this will be a short tour through my workshop.
First, what I’m not going to show you – the “base” of my workshop looks a lot like someone poured a mechanic’s garage into a woodworkers toolshed, and threw in some culinary equipment. Drill press, table saw, giant mixers, scroll saws, bench sanders, and lots of tools. Nothing really special here, and I’ve tended to go cheap (think Harbor Freight) on many items because I just don’t use them often
  enough to appreciate the difference. I guess the one tool in this area that is not found in your average garage is a TIG welder. There are some areas in rocketry in which there is no better alternative then metal, in my case, aluminum. Think motor cases, push rods, even fins. This is an alternate view of my 99 mm aluminum tig-welded fincan that fits perfectly over a 98 mm motor case, which I will be using as the booster section of a minimum diameter sounding rocket I am working on.
 The fun begins with equipment not often found in your typical shop. I build a lot of electronics for fun, including custom electronics for rocketry. While the boards themselves are milled on my cnc machine (which you’ll see in a bit), most of the fun is in my basement office, which happens to also
 be a good soldering bench. With the number of soldering guns and stations I own, you would think I’d be good at it by now, but I’m not. I’m like the baseball player that can’t hit the ball, but sure can run the bases. In this case, I often stumble in the original build, but I’ve gotten really good at reworking a board. In fact, my reflow and rework station equipment is professional grade including IR camera’s and a robotic arm to help my sausage fingers manage the tiny SMT bits and pieces being made today. One of my old hobbies was collecting vintage computers, which provided me hours and hours of electronics board repair training. At one point in my life, I was lucky enough to own an Apple 1, and successfully brought it back to life. I’ve also spent a week rebuilding the electronics in a McDonalds happy meal that stopped working, and brought my eldest daughter to tears……
Next up is a filament winder. This is a computer controlled machine which which allows me to make the rocket sustainers, and other parts out of any kind of filament. Think carbon fiber, fiberglass, Kevlar. basalt, etc. These highly specialized machines normally cost 50,000 to 100,000 dollars. An enterprising guy named Turner Hunt decided to try and make a hobby version, and launched a kickstarter . The first one didn’t go so well, but the second was successful. The entire machine is built with 8020 extruded aluminum, and the same stepper motors I use in 3d printing. The secret sauce is in the software, which can control the number of wraps, and the angle of each wind to create very specific circumferential, or longitudinal tensile strength.
I have done extensive development in openscad to allow me to model different winding angles and build the profile perfectly before even starting a part. In this video I am winding a 6” diameter carbon fiber sustainer, which you will see fly in a video later this year. You can see more videos of the filament winder on one of my YouTube channels.
My second favorite tool is my home made CNC machine. a CNC machine is basically a router, or spind
le bolted to a computer controlled gantry. I sure do love tools controlled by computers! In this case, I can build on my computer exactly what I want cut out in 3 dimensional space, then the CNC machine will do all the work to very, very tight tolerances. Makes things like fins, AV bays and centering rings trivial to make to exact specifications. What is really exciting about a CNC machine is it can go well beyond the basic building blocks, to build extremely complex parts. The x-15 build lower on the page c ould not have been built without a CNC machine. In this video, one of my daughter’s had designed her pinewood derby car on the computer, and we let the CNC machine do all of the work. Needless to say, she won first place in the “best design” category.
 While I’ve talked about 3d printing in a previous post, I should point out I now own 6 different 3d printers, each one getting bigger, and more complex. The “Zoghlin Aerospace” delta printer to the left can build objects over 12” in diameter, 3 feet high. In this photo, it’s building a 4” rocket with integrated fins, and all internal components except the electronics are integrated as it prints. printing the entire rocket at once allows you to build extremely detailed rockets that would be very time consuming, if not impossible using traditional techniques. In the photo b
 elow I was able to integrate a complete Dr. Who callbox into a rocket, and print out the entire rocket and flat nose cone at the same time. As you can see with the green rocke
 t, I can also create traditional rockets, and print out all of the parts at once. If you would like t0 see more, I have several rocketry related 3d prints available on my account thingiverse including
  modular 38 and 54mm rockets, rocket camera holders, and most of the parts for a complete Saturn V (photo of it completed is lower down on this page).
While I use a lot of 3d modeling software products including Inventor, Solidworks, Aspire, there are times when you just want to make a copy of something physical. I have three laser scanners, and a structure I/O device which allow me to take real objects and dynamically build models out of them. In the photos below, I scanned a statue of wife. The laser scanner interprets the statue as tens of thousands of points in space (called a pointcloud). I can then use this pointcloud to create a mesh, which ultimately creates a 3d model. The blue version is the finished 3d model, which looks exactly like the original statue. I’ve scanned lot’s of things, and once again you can find them on thingiverse if you have any interest.


Most of the laser scanners are like the my AIO robotics – a moving platform, and a scanning laser combine to create slices of an object. This works great for small objects, but when they start to get big, it becomes more and more expensive, not to mention the time to get a working model. The Structure I/O (object with a white cover on it) connects to my iPad, and uses the iPad camera, combined with it’s own depth sensors to build models in real time by just moving the iPad around an object. This allows me to get much larger objects, vehicles, people, architectural accents, etc. I scanned my youngest daughter with the structure I/O, then used the model to create a rocket noscone that looked exactly like her head. I scanned a Harpoon missle at the museum of science and industry, then used the dimensions to assist with the harpoon you see lower in the website.
My last major toy is a laser cutter. I don’t need to say much about this one, it’s a big freakin’ laser, controlled by my computer, that can cut almost anything. The version I have is an industrial one, I always keep an eye out for manufacturing equipment that looks like it’s being sold cheap on craigslist. In this case, I was able to get a commercial very large 100w laser with lot’s of accessories (liquid chiller, blower, exhaust system, auto-focus, red dot) for a fraction of the cost of even a low power hobby one.
I have other “toys” in the workshop, like a mini-mill and a 4th axis router, but they are just variations of the wonderful machines I’ve already highlighted. Finally, as I’ve become more proficient in the computer controlled machines, I’ve been able to branch out, and build similar machines that don’t go into my workshop, but are used by the family for other crafts. Below is my Christmas ornament maker. It’s a CNC machine for designing Christmas ornaments. Instead of a spindle, we just put a pen, and away it goes.They made great presents this year.


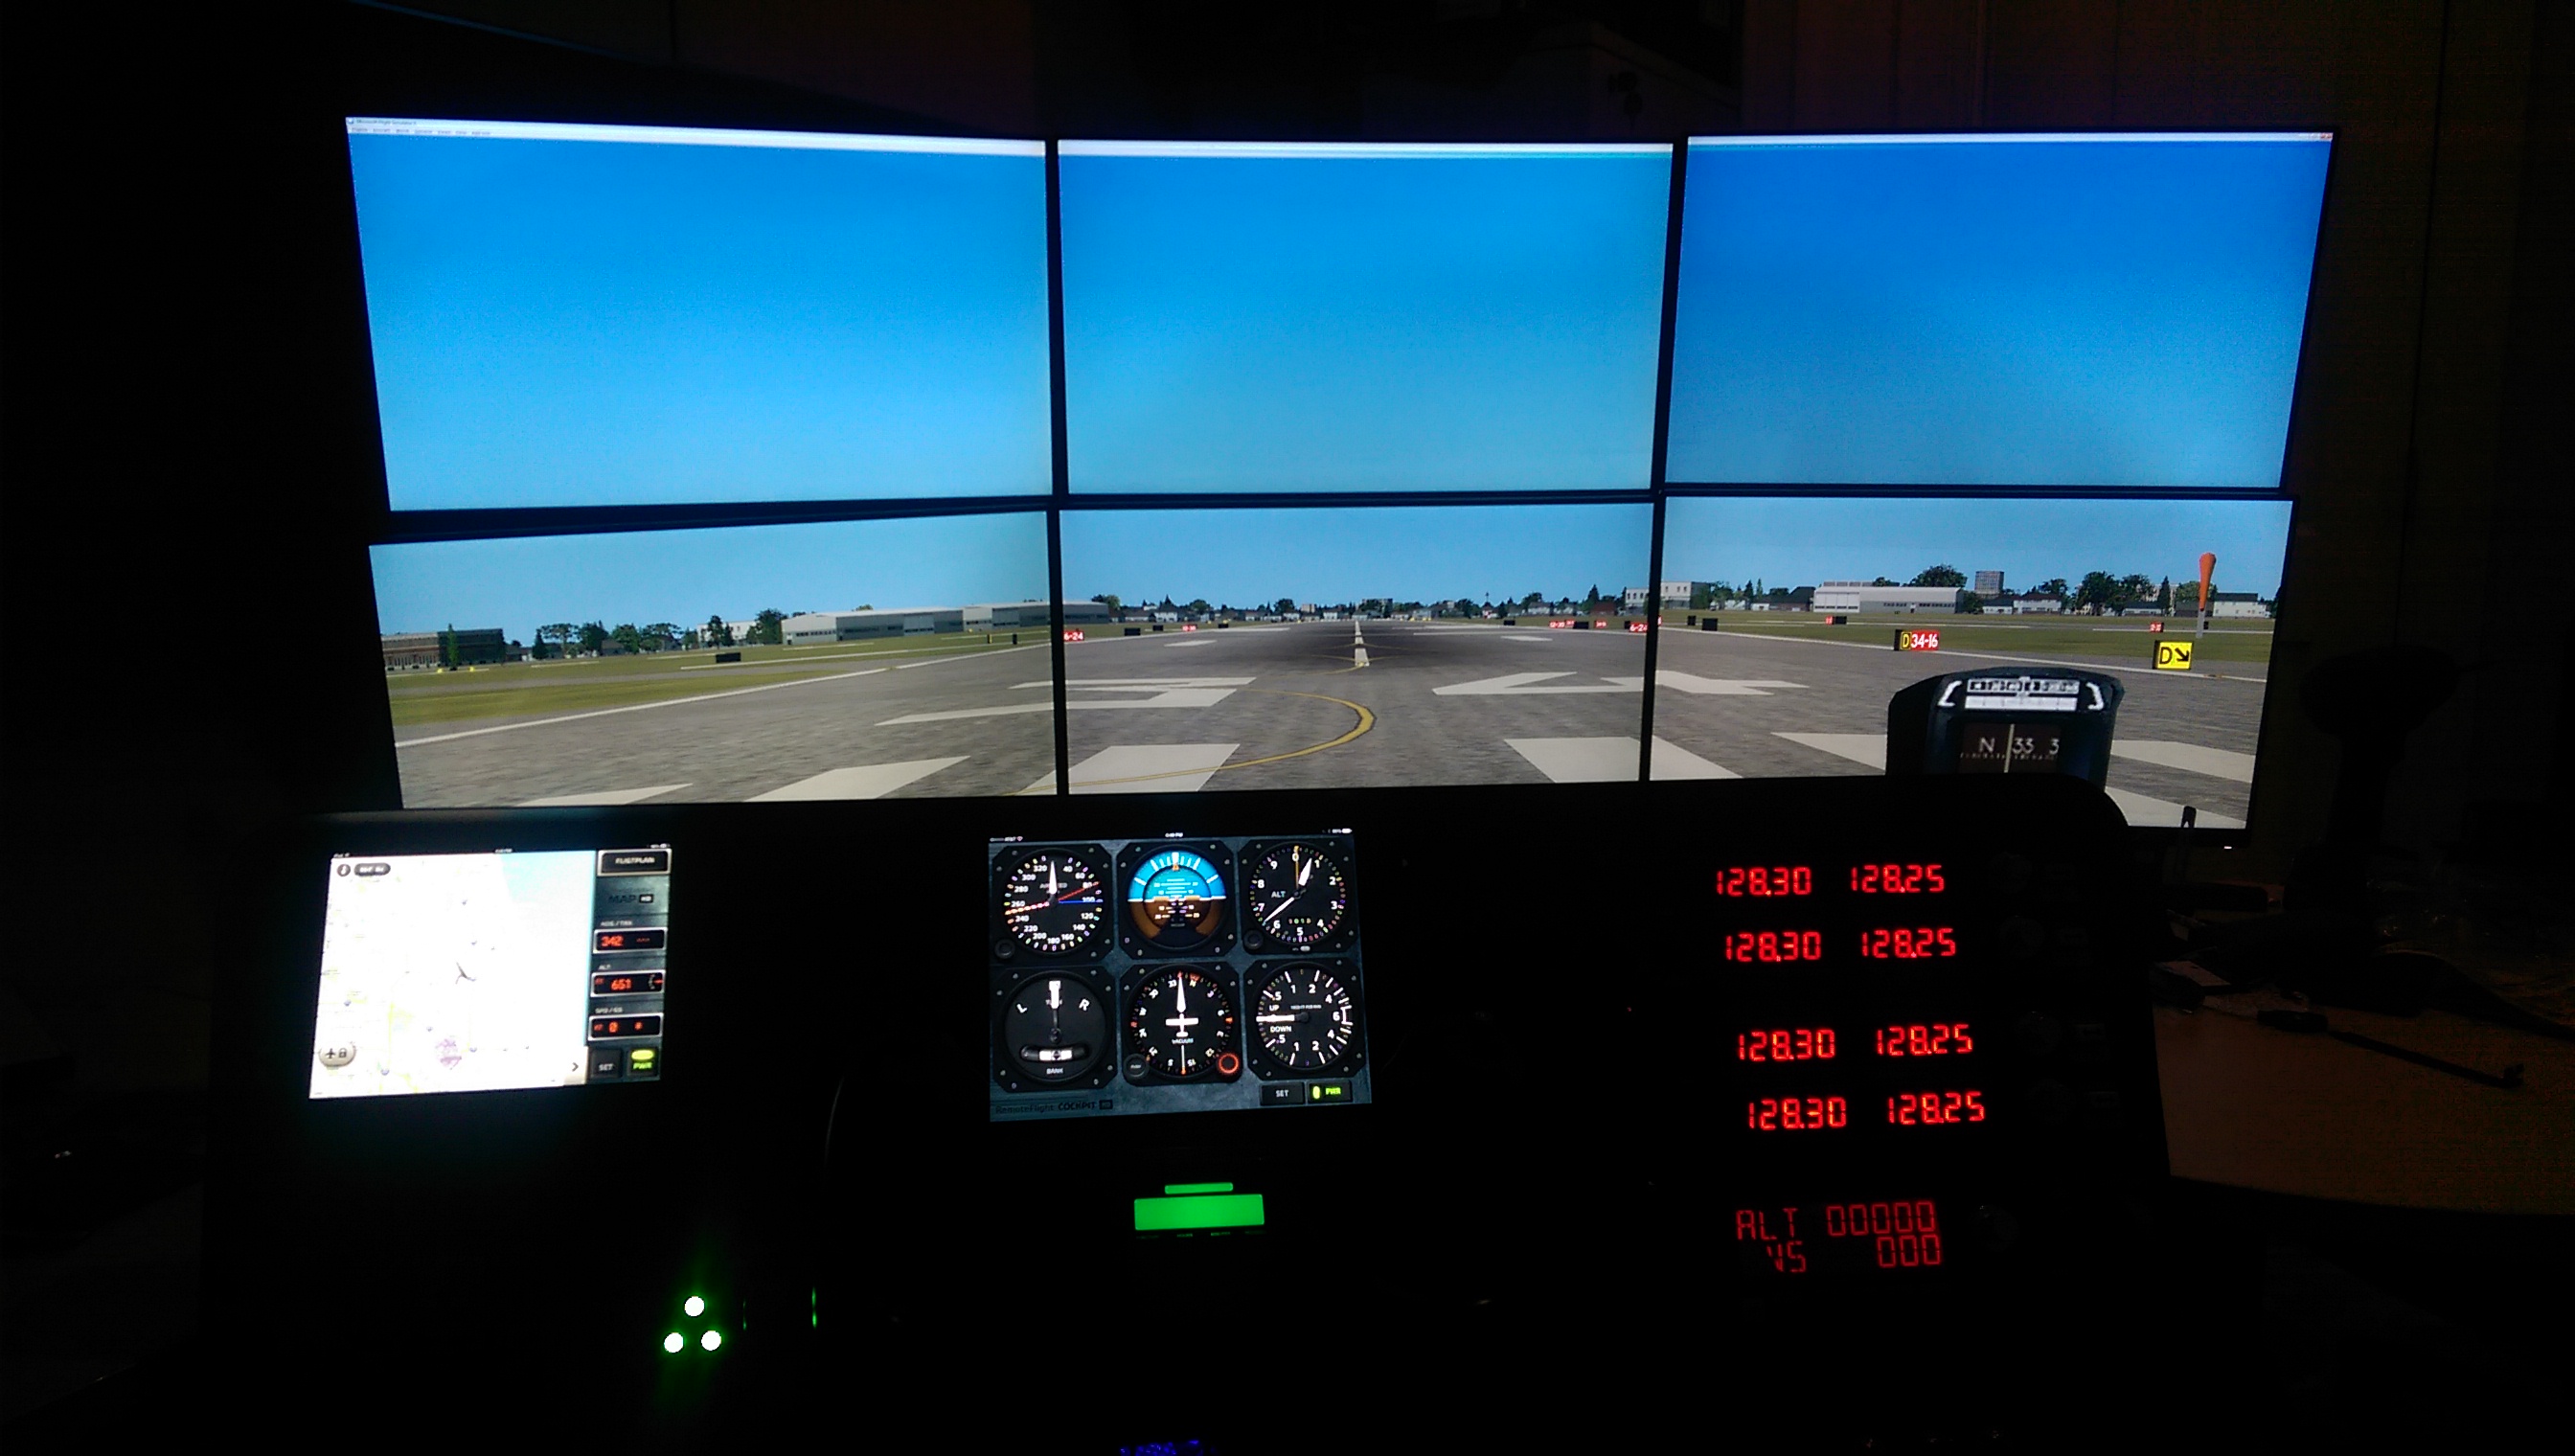
Sorry for the EXTREME delay between posts! Work has been getting the better of me. Given how much knowledge and equipment I’ve collected over the years to build rockets, I’ve found these skills are useful for building other fun electronic projects. I received my pilots license over twenty years ago, but let both the skills, and my license (my medical) lapse long ago. The bug bit me recently to freshen up, and I was amazed at what the state of the art in simulation looked like. Like rocketry, there is a small, but dedicated community of enthusiasts that have made some amazing amateur simulators. While I don’t exactly have the room for a full blown simulator, I was able to build a simulated cockpit panel, and mount it on a movable metal pole to refresh my piloting skills.

I also happened to build a few rockets too :> As soon as we have a warm weekend, I’ll take them out for a photo session. The most common question I get is what tools do I use to build all of these things. In the next installment, I’ll take you on a walk through my laboratory (My wife call is the garage) of CNC machines, laser cutters, filament winders, 3d printers, reflow stations, laser scanners, PCB etching equipment and random tools I use.

Talk about true love! Under our tree this year was a brand new six inch Gorilla Rocket motor, Reloads, Nozzle, and a kit to put it all together. Can’t wait to try it out. Looks like my first chance will be Thunderstruck 5 this spring in Indiana….. Thanks Deann! I love you.


Wow!
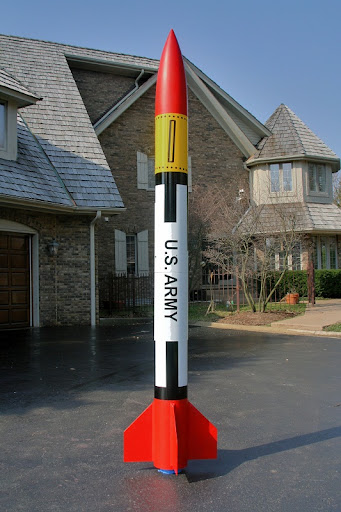
I can’t believe it’s been almost 6 months since my last update. I guess life has been getting in the way. I certainly haven’t given up on rockets – if anything, my other hobbies have been suffering at the expense of rocketry. Spent the winter building, and rebuilding several rockets. A 98mm carbon fiber minimum diameter rocket (Like my old Tachyon here), a Ultimate Wildman (a platform to test some video hardware), and a Saturn V. The Saturn V is about 1/35th scale – as you can see in the photo, it’s significantly larger then my Redstone at almost 11 feet tall. What makes this Saturn V interesting is many of the parts on the rocket were built using my 3d printer. I’m currently working on the 3d model for the Launch Escape Tower. You can download my model from thingiverse page here. Just a word of warning – while the model is finished, it’s not printing correctly. I may need to
  add a raft, and some supports to ensure the build works. The 3d printer itself is an absolute blast. I can’t tell you how much of my free time I’ve wasted. I recently acquired a nextengine 3d laser scanner which essentially allows me to laser scan any object, then print it on my printer. I’ve become my own bespoke reverse engineering manufacturing plant in my basement. You can see some of the 3d scan’s I’ve done on my thingiverse page linked above.

I can basically print an entire rocket ready to launch. This particular rocket is so light and strong (ABS plastic, extruded with a 15% fiill) it doesn’t need a parachute, or even a streamer.

Finally launched the Harpoon!
Flawless launch at Midwest Power 10. Only real issue is I lost the fairing that covered my Go Pro camera, but that was actually by design. I was really worried the fairing would collapse and I would loose any good video. I had read about making an Adruino motion sensing switch on a blog at the University of Illinois Engineering website (my Alma Mater) a few years back and thought it would make an interesting solution to my issue. I built a few prototypes, and eventually settled on a design that would blow the fairing off the rocket if a photosensor detected returning laser radiation over a specific threshold. In the video below, you can see the fairing collapse right at 1:55), the Go Pro picking up the laser dot, then shortly afterward, the fairing is blown off the rocket by a small BP charge. Watching the landing from the ground, I was also a bit worried at the end that the rocket would land on a local farmhouse. Luckily, it missed by a few hundred feet.
The Harpoon has a very unique booster. I can reconfigure the rocket as necessary to fit any configuration of Motor’s I want within a 7.5” tube. Here’s a few photo’s to try and show how it works.
 (1)")
")
I’ll I have to do is make a new thrust plate, and centering rings to fly a completely different motor configuration. 100% of the motor thrust is transitioned to the bottom of the rocket, where it should be.
Next year The Harpoon will fly on one large 150MM center motor, and several smaller air starts for effect. In the meantime, most of my winter building will be on a super-secret new project……

My wife and kids are off at the inlaws this weekend, so I thought it would be a good day to do some clean up. I pulled out all of my rocket’s larger than 7.5” diameter for a group shot


From left to right: 7.5" / 10ft Patriot : 10" / 9.5ft Maximum Thrust Thunderbird : 11.5" /16ft Harpoon : 9.25" / 18ft Iris : 7.5" / 13ft Nuclear Sledgehammer
For perspective, I put a 4 Grain Cesaroni Pro150 in front of the Iris.

Another LDRS 31 has come and gone. As usual, the hosting club put together a really nice event. The first day was much like my first day at LDRS 30: hot and dusty. You can always tell the weather by how my feet look at the end of the day. I was scheduled to launch the Pizza rocket for the Discovery channel first thing Saturday morning. Of course, I had a major last minute electronics failure. My WRC+ handheld unit decided it didn’t want to turn on. It’s a matched pair to the transceiver in the rocket, which meant I had to replace the electronics entirely. A quick trip to Wildman’s trailer, and I was back in business with a missileworks PET2+ timer. I quickly built a sled to install it into the nosecone of the pizza, and reprogrammed it to go off about a half a second after engine burnout. I didn’t have the right equipment to install a power switch, so I opted for the “twist and go” method – this may have been my downfall.
The good news is the Pizza had a great flight. I wasn’t too surprised at how well it flew, as I had at least 30 computer simulations before this launch. To build the simulations, I had to make a lot of assumptions (guesses…) because the underlying software was really built for traditional rockets, and wasn’t totally confident in the math, or aerodynamics. Since the Discovery channel was filming me as I was watching the rocket, I wasn’t able to video, or photo the launch although – I did get some video of the setup, and the discovery channel film crew before the flight
Luckily, several other people were taking photo’s that day, and Chris Dondanville was nice enough to upload all of his photo’s to flickr. Below is a nice burst of shots of the Pizza rocket launch


The bad news is the new electronics malfunctioned, and the parachute failed to come out. Either I programmed the electronics wrong (unlikely – I checked the programming after the launch), or the battery failed. I didn’t anticipate that the rocket would sit idle on the pad for about two hours in 100+ degree heat before the launch. I opted to use a radio shack private label brand nine volt battery. Probably a bad choice given the environment.
The rocket is very light for it’s size (about 30 lbs), with a lot of drag, and it’s built like a tank. Crash landing had absolutely no effect on the rocket that I could find – it’s ready for the next flight. At the end of heat one, I was in the lead of the odd roc competition, primarily because every rocket before mine either cato’d, or disintegrated in flight. I can’t reveal whether or not I won ![]()


I fellow park flyer commented the other day that my blog doesn’t adequately represent my rocket collection, and frankly, he’s right. My girls are enamored with finding things around the house and yard and asking “Dad, can you turn this into a rocket”. The answer is usually yes. About 80% of my rockets are actually odd-roc’s, so I’ve decided to post some photo’s of just a few in my collection. Yes, you’ve seen my night launch saucer, my dining room table w/ pizza, and my collection of crayon rockets, but that’s just a small sample. An odd-roc is any rocket design that isn’t the basic 3FNC, which is three fin’s and a
  nosecone. I’m a big saucer fan – in fact I’m beta testing Art Applewhite’s largest delta design to date – 36 inches in diameter. I’ll post a review after I’m finished with the build and first flight. I also found a kitchen sink at the dump the other day – that will be my ultimate test.

UPDATE: This will now be flying at LDRS 31 in New York. I’ve dramatically reworked the electronics so I can now house a professional high speed HD camera in the gold exhaust port on the right side of the rocket.
Working on my major project for the Thundersrtuck Launch starting this Friday, March 30. Launch will be around 3pm March 30th.
This is a full size AGM-84 Harpoon Missile.


For perspective, that is an 8 foot ladder in the photo above
Thank goodness I’m in good shape – to get this photo I had to carry the two upper sections of the rocket solo up the ladder and into the booster.
I built this saucer for the annual MWP 9 Night launch. Since the night launch has a limited FAA altitude ceiling, traditional rockets just don’t cut it. The RGB LED’S on the saucer are controlled by an Arduino controller which I can control with my phone via Bluetooth. Cool to change the patterns while the saucer is on the pad.
Unfortunately, I wasn’t able to make the launch this year. Next year I plan on embedding the LED’S into the rocket in a matrix so I can transmit scrolling messages to the rocket from the pad kind of like this one, but much bigger

 My Girls have been after me to start a local rocketry club. I’ve been resisting, as I know it will be a l
 ot of work, and they are
") all already over-scheduled. There is no denying the fact that girls and rockets are a natural fit.
all already over-scheduled. There is no denying the fact that girls and rockets are a natural fit.


I was recently asked to go through some old photo’s, and found a bunch of old launch photo’s from loved, but long forgotten rockets. Here are a few:


This was a Rocketry Warehouse Halloween special which included a ‘pumpkin’ parachute..


This is an upscaled Este’s Snitch called “woket”. This particular rocket is still in my fleet, but undergoing MAJOR modifications to turn it into a night launch rocket. I’ll post some video when I’m done adding about 300 LED’S and batteries, and a computer controller to it. Should be an ‘interesting’ flight

Here is an original rocket vision machbuster.
I built this 10 years ago, and finally flew it on a cti f240 Vmax
rocksim indicated it would go 0 to 1200 MPH in about .3 seconds (which is the burn time of the engine), and reach about 4000 ft. I couldn’t fit a tracker on it, but decided to write my phone number on it just in case…..
When the motor lit, it sounded like an explosion. I had a 210fps video camera going, and only got 1 frame of the rocket leaving the pad, which means it was probably going faster than 1200 MPH by my calculations.
I can’t say much more. Nobody ever saw it, or heard from it once it left the pad. Still waiting for my phone to ring ![]()


Short update… Need to get to bed for the long trip home. Day two was just as hot and dirty as Friday. Local’s told me Argonia Kansas just passed their record for days over 100 degrees. When I got back to the hotel Friday night, I took off my sandals to the ugliest site I’ve ever seen – my feet! This town has redefined the word dirty for me. Looks like I have a wicked tan, but it’s just a few layers of dirt.
I was supposed to be in the “odd rocket” Discovery Channel competition on day two with the pizza rocket, but they ran really long and blew through the FAA waiver time before getting to my rocket. They asked me to come early on day three, but I was also in the “fastest rocket” competition, and I didn’t want to screw up all of the prep on that rocket for the pizza. Frankly, I was happy not to launch the Pizza because I have a feeling it will only survive one launch, and I really want to do it with my kids. Sorry Jim – didn’t get a chance to test the WRC+ in a live launch at LDRS, but I’ll be back at Bong in a few weeks.
Spent a fair amount of time being interviewed by Discovery Channel. Don’t know how much of the footage they will use, but it was fun, and I got my 15 minutes of fame (at least in my own mind ![]() ). Also got to meet Kari Byron, the host of Mythbusters. I have to say, I was a bit surprised how nice the crew was. Below is some photo’s my brother took of them taking video.
). Also got to meet Kari Byron, the host of Mythbusters. I have to say, I was a bit surprised how nice the crew was. Below is some photo’s my brother took of them taking video.


Jim Harris was nice enough to ship me a demo 98mm 11000 M1800BL rocket motor. He knows I love his black lightening motors. The motor still isn’t certified, but it sure seems done! My patriot went up over 15,000 feet! The crowd actually clapped at the launch. Jim’s a smart businessman, because I plan on buying the first 98mm certified motor he makes ![]()
Below is the pad video from the launch. Nadine was able to catch a few great photo’s of the launch – I’ll post them when they arrive.


Wow – I never realized Kansas could look and feel like Mars! Temperature today was 103 degrees, wind gusts of 25 mph, with a consistent breeze filled with dust and dirt ensuring no part of your body or equipment was going unpunished.
Because of the Wind, I was a little worried about sending up some of the rockets. Finally decided to send up the large flying saucer. As you can see, I got a bit dirty. They initially put me on one of the close pads, but when the pad manager saw the engine sticking out of the top, he talked to the RSO and shipped me out to one of the away pads. Good thing he did! I had a 54mm motor mount in this saucer – within 3 seconds of launch, the motor mount and motor ripped through the saucer and kept on flying – corkscrewing all the way up. We were able to find the saucer, and it didn’t have any damage. Unfortunately, I have yet to find the reloadable motor.


After a particularly bad experience with BP, I thought there had to be a better solution to rocket recovery than initiating a explosion inside the rocket. I want hot gases to exit the nozzle, not the nosecone!
I’ve been playing with several third party solutions.

The first was was the Chute Tamer. This is a neat idea which uses fishing line to keep the parachute folded, then initiates a ‘cuter’ by heating up an element which melts the fishing line. The filiment is initiated by a timer. I had two issues with the chute tamer. The first issue is it still required BP at apogee to pop the nosecone – either from a traditional altimeter, or motor ejection. Second, you have to do a fair amount of modeling and prediction to determine when the optimal time (vs. altitude) would be for main deployment. I started a conversation with the inventor, Warren Farr about replacing the timer with an altimeter. After a fair amount of back and forth, Warren was kind enough to sell me a few chute tamer’s that were modified to allow me to put my own electronics in. I spent a few months designing two alternatives
Both of these had “issues”, although I did eventually get concept #2 working. This was still only a half solution because it required BP for motor ejection at, or close to apogee. You can find the original chute-tamer here: http://www.chutetamer.com/introduction.shtml

The second product I stumbled upon was a spacetec SRM. This is basically a release mechanism operated by a standard RC Servo. What’s cool about it is the company sells a servocontrol unit which allows the SRM to be connected to a traditional altimeter. The SRM “Holds” the main in the rocket body until the altimeter determines it’s reached the proper altitude. Better solution than the chute tamer on multiple levels (uses an altimeter, no limit to the size chute, as it doesn’t use fishing lline) but still requires BP to eject the nosecone.
Finally, I hit upon an idea – what if I ejected the nosecone using electromagnets? I could easily build a circuit that would charge a very high voltage capacitor, then use an altimeter to initiate the capacitor circuit. I started doing some testing using an Este’s V2, and it worked!The nice thing about the V2 is it has a large diameter to fit all of the equipment, yet it’s really light. I was about to announce my invention to the world when I started having a series of failures starting at MWP 8. The system never failed, but the calculations I had been doing on repulsive magnetic force weren’t working – The electromagnets starting putting out such a large magnetic burst it was blowing the electronics out of the rocket. By now, I started work on my Level 3 certification and decided to put the electromagnetic ejection system on the back burner until I finished.
Fast Forward a year, and I finally found the right project to finish the system. I’ve been building “flying pie”, which is a spool pizza rocket for the last few months, but I found it very difficult to build a simulation to model it’s flight characteristics using traditional software. Add to to this the fact it’s a 75mm minimum diameter motor tube, which means I can’t rely on motor ejection at all (no commercial 75mm motors have motor ejection). In the few flight trials I did with the spool, the flight characteristics where so different than a traditional rocket the G switch timer, and altimeter had a hard time reliably detecting launch, and/or apogee.

Around this time, Darrell Mobley at RocketryPlanet told me that Jim Amos at Missileworks was going to be building an updated version of his WRC wireless control system. The WRC allowed the rocketeer to take control of the ejection process using a remote control rather than relying on a traditional altimeter. This seemed to be the perfect solution to initiate recovery on a rocket that traditional altimeters had a hard time with. Jim was kind enough to let me into the beta program for his updated wrc+. I will dedicate another post to a review of the wrc+, but the one line review is “awesome”.
Since I now had a reliable electronics, I decided this would be a good time to pull out the old electromagnets, capacitor charge boards, and rare-earth magnets to turn the pizza pie into my new magnetic sky lab.
using one of featherweights new magnetic switches so I didn’t have to cut a hole in the av-bay, or rocket.

I have two lithium batteries – one 9 volt to power the wrc+, and one 12 volt on a circuit with an opto-isolator (so I don’t blow the wrc+) and a 300 volt capacitor.
The capacitor is connected to the external terminal ports on the top of the av-bay. I then connected this to two electromagnet’s at the top of the rocket (cheap chinese – http://www.ebay.com/itm/20mm-12V-Holding-Electromagnet-Lift-2-5kg-Solenoid-/150638839722?pt=LH_DefaultDomain_0&hash=item2312c647aa#ht_1471wt_1164). In the nose cone, I have two large nickel-plated neodymium magnets glued into the nosecone bulkhead. The magnets are naturally attracted to the metal on the top of the electromagnets, keeping the nosecone on.

When I’m ready, I just use the wrc+ to initiate the capacitor, which energizes the electro-magnets, creating a short, but massive repelling magnetic force against the rare earth magnets in the nosecone, which should pop the nosecone if everything goes well….
Here’s the first test this afternoon:
Actually worked on the first try! While there was not a lot of force (I’m a bit gun-shy from my previous research) this rocket is probably ok, as the lamp shade will get caught in the wind pulling out the parachute.


Well, I’m scrambling to finish a few rockets for LDRS 30. I’ll be bringing at least 6 rockets. 3 oddrocs, and 3 ‘traditional’ rockets. Here’s a few photo’s

This X-15 is probably one of the most difficult builds I’ve ever done. I had to redo the fiberglass several times, and getting the fillets to look good on all of those contours was next to impossible. I wound up dipping my finger in alcohol, then hand creating the fillet. Not a process I want to repeat, but it’s nice to know you can get this much control.

I plan on entering this one into the Discovery channel oddroc competition. The Pizza is a photo of a dominoes pizza my family ate earlier in the summer.

Mark Hayes at Stickershock did a fantastic job making the Vinyl from my photo. Makes me hungry just looking at it! I had a heck of a time trying to simulate how this rocket would fly – we’ll see in a few weeks.

This is Tachyon, my entry into the “worlds fastest rocket”. It’s all plastic and hand laid Carbon Fiber. I’m not quite finished with the rocket, still needs some work on the inside, and I’ll be ordering from Vinyl for it to make it look a little nicer. The rocket itself weigh’s in at a bit less than 6 lbs. I will be putting a rocket motor in that weighs over three times as much, and will launch with twice the power of the Hennessey Viper Venom race car I sold to make room for my rocket collection…..
This one should look familiar. I’m bringing it along because Jim Harris at Gorilla Rocket Motors sent me one of his new 98mm Black Lightening motors to demo at LDRS (it’s not certified yet). This is a very sturdy rocket, and I know it will be able to handle the punch of his new motor. I’ve had to sand the nozzle down to fit his slightly modified liner – I hope it doesn’t CATO!
I’ll be bringing more rockets, but you get the idea.

Well, after almost a year, I finally finished the crayon rockets.
Hopefully we will have a drag race tomorrow at Tripoli Wisconsin. Don’t tell the little one’s, but it isn’t a fair race. All of the crayons have a 29mm motor mount, except one, which has a 38mm motor mount.

Launched my Patriot a couple of weekends ago on my first Gorilla Rocket Motor. This is Jim’s version of an AMW skidmark – I think he may have actually created a better version! Certainly better then the CTI skidmark, or Aerotech metalstorm.

Just a little wifey humor

Well, the weather doesn’t look too good for a launch, but I’ll go up to see what the field looks like. My TAP members will be up there at a university launch event.
Launch will be held at the Richard Bong state Recreational area just over the boarder in Wisconsin (http://dnr.wi.gov/org/land/parks/specific/bong/index.html#directions). I plan on launching between 12 and 1 pm, unless the weather doesn’t cooperate again.
Since I had a few weeks of downtime, I’ve made some modifications to the rocket. Here’s a list for posterity:
Replaced the small screw switches I was using for power in the altimeter bays with large SPDT Push button switches. This will make it MUCH easier to reach into the rocket with a screw driver to turn on the electronics.
Added a much beefier ubolt and retention steel plate to each side of the altimeter bay. This was at the recommendation of one of my TAP sponsors, and a good one.
Ordered a giant 3/4” wing nut to replace the 3/4” bolt I was using to secure the nosecone bulkhead. This will let me insert and replace the bulkhead without any bulky tools.
Ground tested the upper sustainer ejection. Based upon the results (successful) I Reduced the amount of black powder I was planning on using, and repositioned one of the blastcaps.
tough weekend for the “questionable investment”.
Had to scrub the launch on Saturday due to bad weather. Sunday was a beautiful, sunny day, but 25-30 MPH winds. Looking to reschedule for early May (possibly the 7th, weather permitting)
